Purpose
Table of Contents
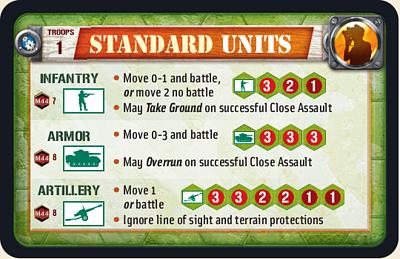
There are 3 main types of units in the game: infantry, armor and artillery. (You can also add trucks, planes, ships and trains, but they are not supported in the Online game).
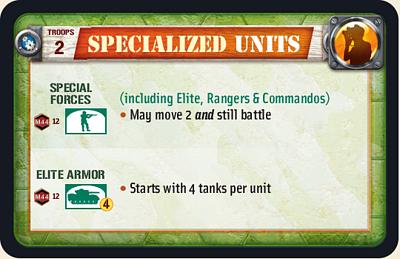
In the Editor, both infantry and armor have standard and elite (a.k.a. special forces) versions, making 5 unit types.
The boardgame and its expansions had 5 sets of figures: German, Allied (US+), Russian, British and Japanese nation units. The Editor breaks them down accordingly into 5 somewhat different colors. Two of them have special rules that automatically come into effect for their units in the Online game; (these are described below).
In the Map Tab you can add a badge to units. Some badges are just to show which are elite units (since they look identical in the Online game); while a few badges change the abilities of these units (such as French Resistance). There's a chart of badges you can add below, or jump via links in the Table of Contents on the right.
On this page, Online game problems are listed in red.
Some badges are not supported in the Online game.
See unsupported items for a list of rules, terrain, units, etc. that have problems in the Online game.
Although terrain hexes are added in the Map Tab, special rules for them are usually added in the Expert Tab.
Exceptions involving interesting Terrain types are at the bottom of the page.
Review
Once you open the Editor, you start under the "Map" Tab. This is where you build your map. It should look like this: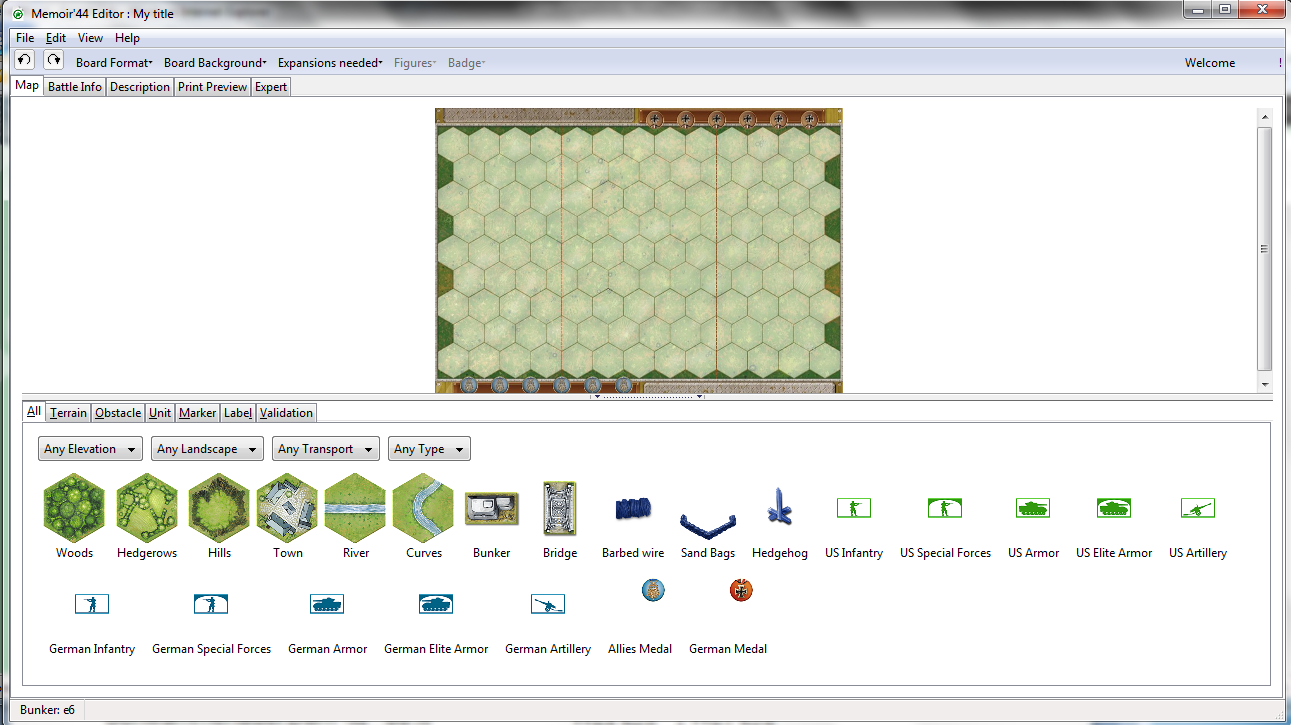
The bottom panel, or Game Tray, contains the 23 items from the basic set you can add to the map.
(During the Online game, you can right-click a hex for rules pertaining to that scenario and that hex; but not in the editor. For rules information go to Rules, Core Game.)
The Game Tray default is the "All" tab. Later, when you select under "Expansions needed" it adds items from the expansion pack selected. The Game Tray can become quite cluttered (& showing scroll bars). So you have the option of clicking on a tab for just units, or just terrain, etc. For now, stick to "All".
Add / Remove Objects
There are two ways to add objects from the Game Tray to the map.- The simple way is to "drag-and-drop".
- If you are going to put a lot of the same item on the map (e.g. hills), then you can double click the object, and then click on the hexes you want it to appear. To unselect the object, you must either click on the grey board edge beside the 6 medal holders, or drag-and-drop a new object, or double click another object.
Enlarge the Map
Once you've tried to add things to the map, you may find the hexes to be quite small. You may want to have the map take up a larger portion of the screen. Select either the following hot key, or the menu at the top:[CTRL L]........View-> Game Tray on the Left
Now the following functions will work:
[CTRL 0]........View-> Scale to fit
[CTRL +]........View-> Zoom in
[CTRL -].........View-> Zoom out
[CTRL-B].......View->Game Tray on the Bottom
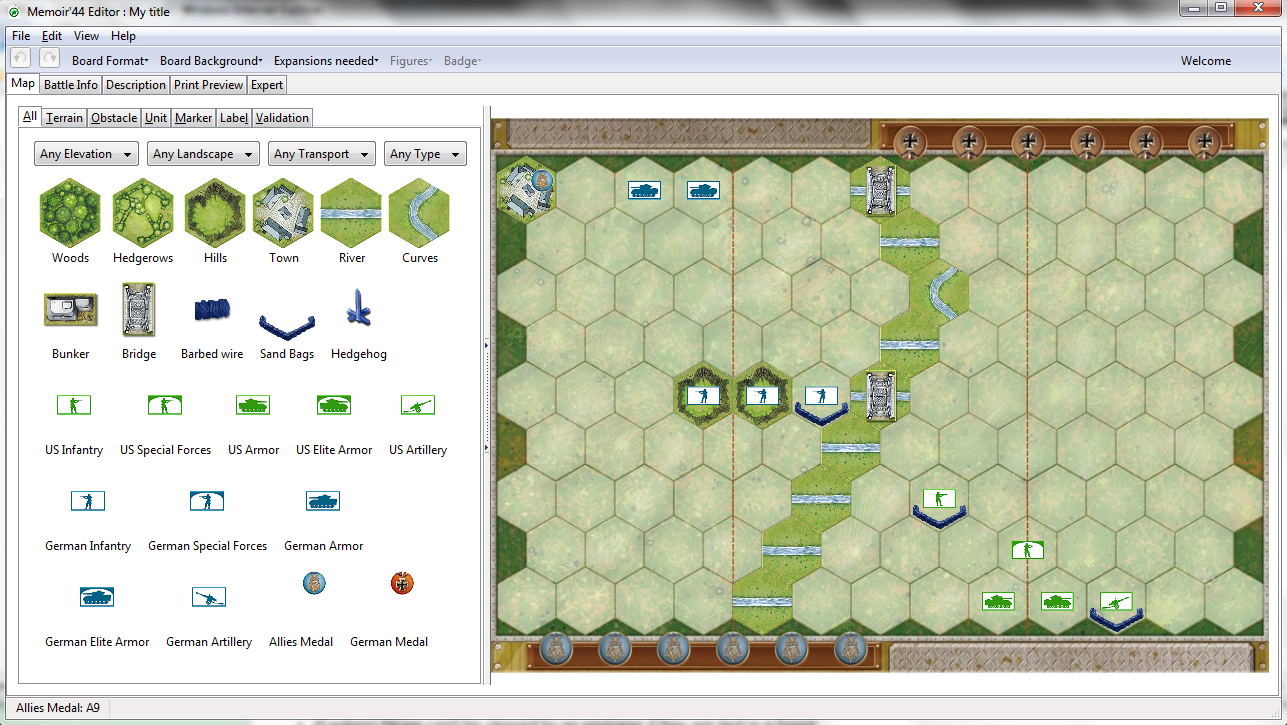
Here's what it should look like - a map that fills most of the screen. If you've tried to drag and drop elements, your map looks something like this. Maybe some things don't look quite right, like the bridges, rivers and sandbags. They need to be rotated.
Rotate Objects
At the top left are 2 rotation buttons, counter-clockwise and clockwise. First highlight the item you wish to change. You may have to click around if there's more than one item in a hex. The rotation buttons then become enabled (see pic). You can click one, and watch the selected object change. One rotation flips sandbags; you may need several for bridges and rivers to get the best orientation.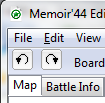
Nation units
Of the 5 sets of units, 2 have special Nation rules associated with them.Japanese
When Japanese Infantry units are added to the map, the Online game automatically recognizes the following rules (see pic):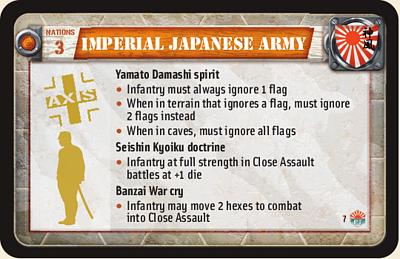
Error: The Online game doesn't recognize these rules when badges are added to Japanese infantry, though in most cases it should.
British
When British units are added to the map, the Online game automatically recognizes the following rules (see pic):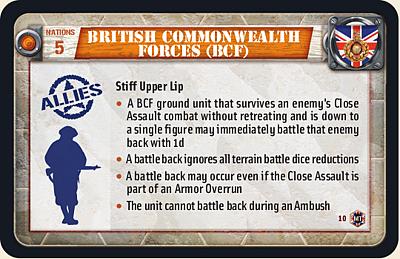
Error: The Online game doesn't allow British armor units to move 3, normally, though it should unless scenario rules limit them.
Error: Sometimes the Battle Back die roll occurs off-screen (after British player clicked Yes - ignore first flag).
Error: Battle Back should not occur in terrain from which unit cannot battle (e.g. Ocean).
Badges
Below is a chart of the 5 units and the badges that are available to assign them in the editor, when all expansions are selected.Strangely, the editor allows you to put one nation's or side's badges on another's.
A unit can only have one badge.
Badges can be divided into several types:
- Badges that are available only as special forces for Elite Infantry or Elite Armor (as described below). They shouldn't give any additional abilities.
These are marked with a * under the "notes" column.
Error: Japanese Special Forces Infantry don't work properly. - Badges that are available for all types of units, regular, elite, or artillery. These seem to be for national units (Australian, New Zealand, Gurkha, etc).
[Q: Do any of these badges below without notes (Chinese, Polish, etc.) have special rules in official scenarios?]
Error: Italian Nation rules don't work when Italian badges are on units in Expert Scenarios. Official scenarios with Italians work, so must have been programmed specially.
Try to avoid putting badges on non-elite units when making games to be played Online. Players need to know when they can move an infantry 2 and still attack, and when they can't. - Badges available for just infantry and elite infantry (e.g. SAS) or armor and elite armor (e.g. 2e DB).
[Q: Do these give any special abilities?] - Badges for Combat Engineers (as described below).
Error: Italian Engineers and "Japanese Elite" (Engineers) don't work properly. - Badges for units with special rules that are largely supported:
French Resistance, Russian Sniper, German Sniper, Finnish Ski Trooops, Anti-tank Gun, Flame Thrower Tanks and Mobile Infantry. Instructions follow the chart. - Badges for units with special rules that are NOT SUPPORTED; these are marked as such under the "notes" column.
| INFANTRY |
ELITE_INFANTRY |
ARMOR |
ELITE_ARMOR |
ARTILLERY |
notes |
| British_"Pegasus"_Badge |
British_"Pegasus"_Badge |
* |
|||
| US_Rangers |
US_Rangers |
* |
|||
| French_Resistance |
French_Resistance |
French_Resistance |
see_below |
||
| German Special_Forces |
German Special_Forces |
* |
|||
| German_Engineers |
German_Engineers |
see_below |
|||
| Italian_Engineers |
Italian_Engineers |
not_supported |
|||
| English_Engineers |
English_Engineers |
see_below |
|||
| US_101st_Airborne |
US_101st_Airborne |
||||
| Big_Guns |
not_supported |
||||
| Afrika_Korps |
Afrika_Korps |
Afrika_Korps |
Afrika_Korps |
Afrika_Korps |
|
| US_Engineers |
US_Engineers |
see_below |
|||
| German_Rosette |
German_Rosette |
German_Rosette |
German_Rosette |
German_Rosette |
|
| New_Zealand |
New_Zealand |
New_Zealand |
New_Zealand |
New_Zealand |
|
| Gurkha |
Gurkha |
Gurkha |
Gurkha |
Gurkha |
|
| Australia |
Australia |
Australia |
Australia |
Australia |
|
| Chinese_Nationalist Forces |
Chinese_Nationalist Forces |
Chinese_Nationalist Forces |
Chinese_Nationalist Forces |
Chinese_Nationalist Forces |
|
| Italian_Special_Forces |
Italian_Special_Forces |
not_supported |
|||
| Spanish Republicans |
Spanish Republicans |
Spanish Republicans |
Spanish Republicans |
Spanish Republicans |
|
| Yugoslav_Partisans |
Yugoslav_Partisans |
Yugoslav_Partisans |
Yugoslav_Partisans |
Yugoslav_Partisans |
|
| Polish_Troops |
Polish_Troops |
Polish_Troops |
Polish_Troops |
Polish_Troops |
|
| German_Sniper |
see_below |
||||
| Russian_Sniper |
see_below |
||||
| 2e_DB |
2e_DB |
||||
| SAS |
SAS |
||||
| British Special_Forces |
British Special_Forces |
* |
|||
| Soviet Special_Forces |
Soviet Special_Forces |
* |
|||
| Soviet_Engineer |
Soviet_Engineer |
see_below |
|||
| Cavalry |
not_supported |
||||
| Finnish_Ski_Troops |
Finnish_Ski_Troops |
see_below |
|||
| Japanese_Elite |
Japanese_Elite |
not_supported |
|||
| US_Marines_Corps |
US_Marines_Corps |
US_Marines_Corps |
US_Marines_Corps |
US_Marines_Corps |
|
| Anti_tank_Gun |
Anti_tank_Gun |
see_below |
|||
| Flame_Thrower |
Flame_Thrower |
see_below |
|||
| Japanese Special_Forces |
Japanese_Special Forces |
infantry not_supported |
|||
| Mobile_Artillery |
see_below |
||||
| Italian_Troops |
Italian_Troops |
Italian_Troops |
Italian_Troops |
Italian_Troops |
not_supported |
| Depleted_unit |
Depleted_unit |
Depleted_unit |
Depleted_unit |
Depleted_unit |
not_supported |
| Brandenburgers |
Brandenburgers |
not_supported |
|||
| Mortar |
Mortar |
not_supported |
|||
| Machine_Gun |
Machine_Gun |
not_supported |
|||
| US_504th_PIR |
|||||
| Polish_Dragoons |
|||||
| 82nd_Airborne |
|||||
| Jungle_Fighters |
not_supported |
||||
| Half_Tracks |
Half_Tracks |
not_supported |
|||
| Tank_Destroyer |
Tank_Destroyer |
not_supported |
|||
| Heavy_Anti_Tank |
not_supported |
Elite Infantry

 Elite infantry (a.k.a. Special Forces) can move 0-2 and attack (same w/Infantry Assault card).
In the map example above, the Allied infantry on the line for Center and Right sections is an elite infantry. However, Online they still look like normal infantry. You may have seen some scenarios that state, "all infantry are elite... no badges are required." Well, for the Online game, badges ARE required for players to see the elite status.
Here's how to add a badge:
- Add an elite infantry unit to the map (e.g. US Special Forces, see above).
- Highlight the elite infantry unit in the hex (not the terrain, medal, obstacle, etc.).
- Go to Badge↓ (it turns on when you highlight a unit.)
- Select the appropriate badge for that unit. Base game choices are:
- None (default)
- British "Pegasus" badge
- US Rangers
- French Resistance
- German Special Forces
Likewise, DO NOT add a badge when you aren't using elite infantry; players will move it 2 and not be able to attack (exceptions below).
A list of elite infantry badges for many nations can be found at Elite Infantry.
Elite Armor

 Elite Armor (a.k.a. Special Forces) consists of 4 figures.
Usually this is for German armor, but not always.
Here's how to add elite armor:
- Add an elite armor unit to the map (e.g. German Elite Armor, see pic above)
- Highlight the elite tank unit on the map (not the terrain, medal, obstacle, etc.),
- Go to Badge↓ (see Elite Infantry above),
- Go to Figures↓ (default is "-"),
- Select 4.
(When you play Medics/Mechanics, you want to know if you can restore an armor unit to 4 figures.)
Combat Engineers
Many rules for Combat Engineers are on the following reference card pic: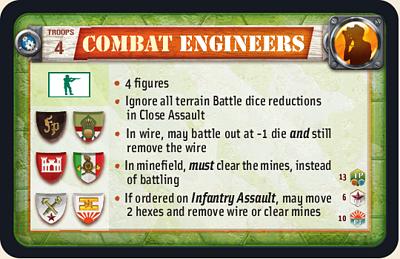
British Engineers: British Commonwealth Forces Rule (Stiff Upper Lip) works when units are British (tan infantry).
Roadblocks aren't supported, so Engineers' ability to remove Roadblocks is not applicable.
In the Online game, Engineers currently have some support problems for their rules:
- Engineers won't clear mines instead of battling if they start on a minefield. That means they can never clear mines on Towns & Villages, Forests & Palm Forests and other terrain where they cannot move in and battle the same turn.
- Engineers should not be able to clear mines after Taking Ground.
- Engineers can't score a medal for discovering a decoy mine when they remove mines. See Official Scenario, "Into the Cauldron".
- You must either click on the hex to clip wire after battling or Take Ground; otherwise game may freeze.
- Italian Engineers: Italian Army Rules don't work.
- Japanese Engineers: Japanese Army Rules don't work with Engineers.
Here's how to add Combat Engineers:
- Add an infantry unit to the map.
- Select an expansion pack with the badges you'll need (under Expansions needed↓ or Battle Info tab):
- Terrain Pack (German Engineers, US Engineers, English Engineers, Italian Engineers)
- Eastern Front Pack (Soviet Engineers)
- Pacific Theater Pack (Japanese Elite, English Engineers, US Engineers)
- Mediterranean Theater (German Engineers, English Engineers)
- Highlight the infantry unit on the map.
- Go to Badge↓ and select an engineer appropriate to the figure.
French Resistance
See Official Scenario, "Mont Mouchet".Most French Resistance rules are listed in the following reference card:
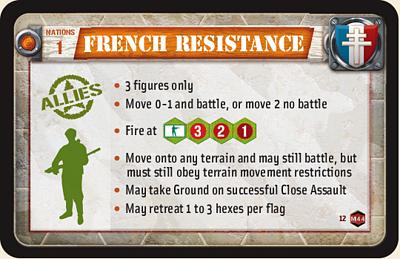
French Resistance "must still obey terrain movement restrictions" which seems to mean...
- Various terrain: "Unit moving in must stop,"
- Hedgerows: "To enter or Take Ground, unit must start its move from adjacent hex."
Here's how to add French Resistance:
- Highlight an Allied unit on the map,
- Go to Badge↓ and select "French Resistance."
British Resistance?
The following are not official rules, but the editor and Online game allow for interesting variations.- You can change the figure count (see elite armor above) to have 4-figure French Resistance units.
- You can put French Resistance Badges on other nations' figures, such as German or British infantry (the latter gives the "Stiff Upper Lip" battle-back).
Snipers
See Official Scenario, "Red Barricades Factory".Most Sniper rules are listed in the following reference card:
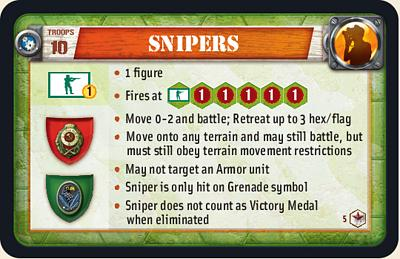
Snipers also ignore terrain battle reductions, except the -1 when on wire.
Snipers can get the +1 die benefit from Their Finest Hour, Close Assault and Firefight.
Snipers "must still obey terrain movement restrictions" which seems to mean...
- Various terrain: "Unit moving in must stop,"
- Hedgerows: "To enter or Take Ground, unit must start its move from adjacent hex,"
- Jungles: "Unit moving in may battle if unit starts its move in adjacent hex."
Currently there are only badges for German Snipers and Russian Snipers, but you can put these badges on Japanese and Allied units, respectively.
- British. British snipers should not get the British Commonwealth Forces Rule (a.k.a. "Stiff Upper Lip" / Battle Back) in the Online game.
- Italians. Snipers have same retreat ability so it doesn't matter that Italian Nation rules don't work.
- French Resistance. Snipers have the same retreat and move-and-battle ability.
- Japanese. Japanese Army rules don't work with Snipers (can't ignore flags or get extra die). This is correct.
Here's how to add Snipers:
- Choose Eastern Front Pack (under Expansions needed↓ or Battle Info Tab),
- Highlight a standard infantry unit on the map,
- Go to Badge↓ and select the appropriate one, "Russian Sniper" or "German Sniper,"
- Go to Figures↓ and change from default "-" to "1" (note: "2" and other #s may be allowed but are not normal Snipers).
Ski Troops
Ski Troops were introduced in the Eastern Front Pack. See Official Scenario, "Suomussalmi".They were Finnish, represented by German units, but the Ski Troops badge can be placed on infantry units of other Nations.
Most Ski Troop rules are listed in the following reference card pic:
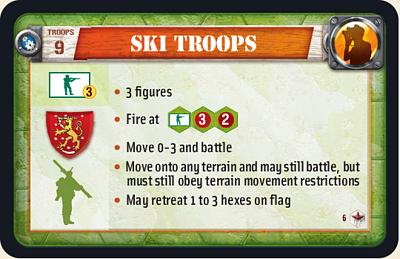
Ski Troops "...must still obey terrain movement restrictions", which seems to mean...
- Various terrain: "Unit moving in must stop",
- Hedgerows: "To enter or Take Ground, unit must start its move from adjacent hex",
- Jungles: "Unit moving in may battle if unit starts its move in adjacent hex".
Here's how to add Ski Troops:
- Choose Eastern Front Pack (under Expansions needed↓ or Battle Info Tab),
- Highlight a standard infantry unit on the map,
- Go to Badge↓ and select "Finnish Ski Troops".
The default is 3 figures, which is seen during the game.
Anti-Tank Guns
See Official Scenario, "Into the Cauldron".Most Anti-Tank Gun rules are listed in the following pic:
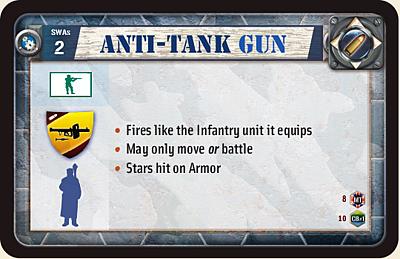
- SWAs (Special Weapon Assets) cannot Take Ground.
- Early War Anti-Tank Guns (SWAs #2) may move and battle with Behind Enemy Lines, only. This is not an error.
- Late War Anti-Tank Guns (SWAs #5) may move and battle, but are unsupported in the Online game.
- Error: Japanese Anti-Tank Guns do not benefit from Japanese Army Rules.
- Add an infantry to the map.
- Select Mediterranean Theater, Campaign Book, or Winter Wars (under Expansions needed↓ or Battle Info tab).
- Highlight the infantry on the map.
- Go to Badge↓ and select "Anti-tank Gun".
Flame Thrower Tanks
See Official Scenario, "The Meat Grinder".Flame Thrower Tanks rules are listed in the following reference card pic:
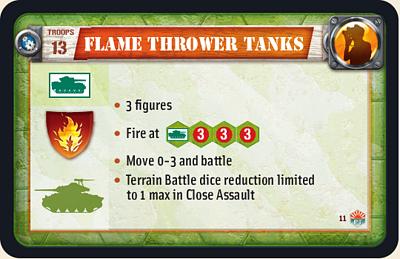
- Add an armor unit to the map (any nation, regular or elite).
- Select Pacific Theater Pack (under Expansions needed↓ or Battle Info tab).
- Highlight the armor unit on the map.
- Go to Badge↓ and select "Flame Thrower".
Mobile Artillery
See Official Scenario, "Sugar Loaf and Half Moon".Mobile Artillery rules are listed in the following reference card pic:
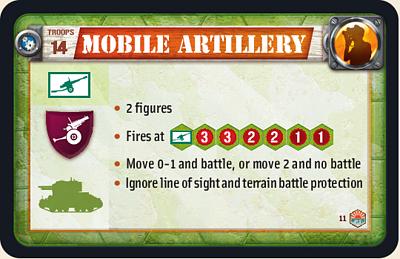
- Add an artillery unit to the map (any nation).
- Select Pacific Theater Pack or Winter Wars (under Expansions needed↓ or Battle Info tab).
- Highlight the artillery unit on the map.
- Go to Badge↓ and select "Mobile Artillery".
Terrain
The following Terrain and obstacle have interesting properties when added to the map, and don't need to be adjusted in the Expert Tab.Escarpments
Prior to the version of the Editor released in January 2012, the only way to make "impassible hills" that block line of sight was to use Escarpments (see pic). This could make your scenario look odd, since they are desert terrain, but everyone could know what they were dealing with. Now you can make "impassible hills" with standard hills or mountains, see Expert Tab. During play you should right-click the mountains or hill hexes to be certain of the rules.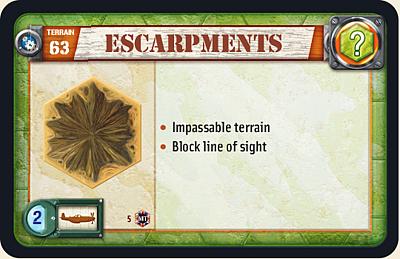
Error: Terrain that blocks line of sight should do so even at elevation (per FAQ). However Escarpments (and impassible hills and mountains) will not block line of sight between two hills.
German Caves?
Caves on Hills came with the Pacific Theater expansion. But there's no rule preventing it from being used in a European or Mediterranean scenario.Only Japanese units get the special defense and movement ability of caves, shown on the following reference card pic:
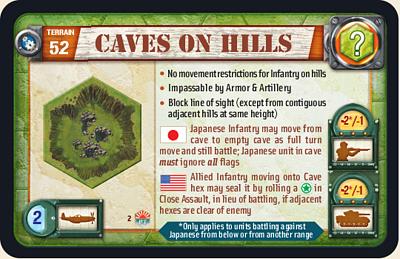
Without Japanese in the scenario, these act as normal hills, but impassible to armor and artillery.
Allies only could attempt to seal caves (turns to normal hills) in order to bring up their armor or artillery.
Error: Allies can roll twice, one of which seals caves automatically.
Bunkers & Field Bunkers
These are pics of Bunkers and Field Bunkers. Note: The Winter Bunker on the Right counts as a Field Bunker Online. |
| Bunker |
 |
| Field Bunker |
 |
| Pacific Field Bunker |
 |
| Desert Field Bunker |
 |
| Winter Field Bunker |
For Field Bunkers either side can benefit from defensive protection (-1 infantry, -2 armor, ignore first flag).
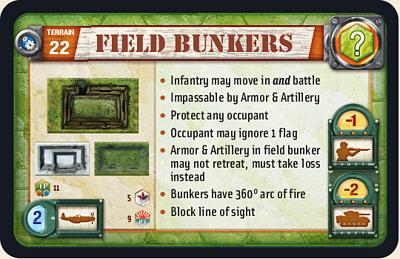
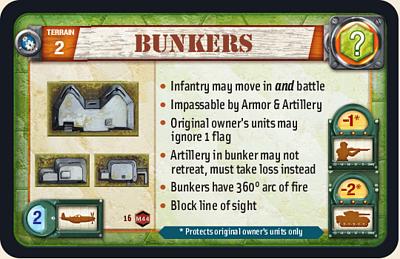
For Bunkers, scenario rules usually state that only one side gets their defensive protection.
Currently there is no setting under Expert Tab for ownership of Bunkers.
- Axis Bunkers: place an Axis unit in the Bunker on the map for the start.
- Allied Bunkers: place an Allied unit in the Bunker on the map for the start.
- Bunkers will then provide protection only to that side for the rest of the game, even after the unit moves or is destroyed.
Error: empty Bunkers and empty Field Bunkers on hills will not block line of sight.
Error: Armor units that start in bunkers should not be able to leave (same as artillery). Online they can. Don't put armor units in Bunkers.
Validation
Validation is supposed to show you whether the map you have made can be built from the tiles in the expansions you've selected.Error: Editor gives maximum Winter Forests in Winter Wars as 20 instead of 22.
Links
Tabs: Map, Battle Info, Description, Print Preview, Expert.
See also Unsupported items, Tips and Tricks.